DIY Birthday Card: Sweet Cupcake
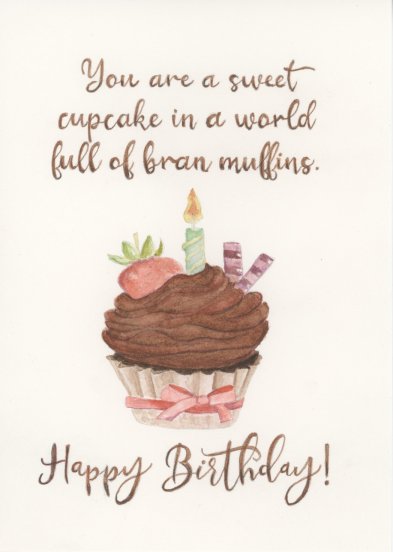
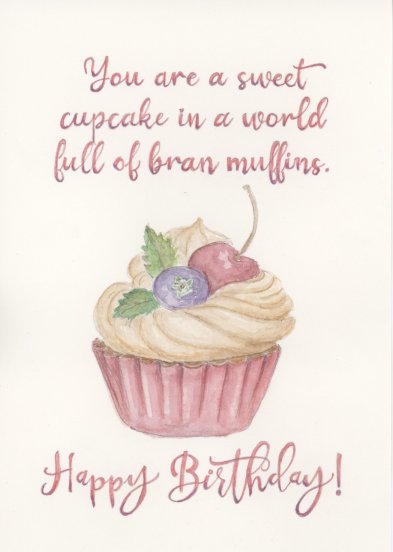
Here's an idea for a diy birthday card. The downloadable kit includes two drawing designs in a 5x7 portrait orientation. The design can be painted in whatever colors or format you choose. There are several finished examples on the final pages of the kit document.
Supplies you'll need for this diy birthday card:
- Painters or masking tape and a surface (cardboard or a clipboard)
- Strathmore watercolor card, 5x7 size
- Watercolor paper for testing (optional)
- Pencil and kneaded eraser
- Graphite paper or a light table
- Watercolor paint or watercolor pencils (I used: burnt umber, permanent rose, hooker’s green, yellow medium, titanium buff, ultramarine blue and pencils to match).
- Watercolor brushes: small and medium round with a point.
- Clean jar of water
- Permanent Sakura Micron or other similar brand of markers, or watercolor
pencils in matching shades for the lettering.
 |
 |
Steps to a Finished DIY Birthday Card
I recommend reading through to the end of these instructions before you start to paint.
- Choose the diy birthday card design you like from the downloadable kit and print out that page on your printer, making sure to set the page size to actual size.
- Using either graphite paper or a light trace device, trace the image onto the front of a 5”x7” watercolor card. Use a light touch. The idea is to have a drawing to follow but not to make it so dark that it shows through the transparent watercolor paint.
- *TIP: You may want to trace this onto an sheet of watercolor paper first, so you can practice and decide on your colors and style before moving onto the actual card.
- Tape the drawn card down to a sturdy surface to minimize buckling when you paint. If you plan to add a background color, make sure the tape is applied so that your unpainted borders will be straight and even when you are done.
- Pull off a penny-sized piece of the kneaded eraser and roll it into a ball so you can dab and lighten the pencil marks. They may still show through the paint but not as darkly.
- Paint the image in the stages discussed below. Use the finished examples included in this kit for inspiration or choose your own color palette. If you are right-handed, you’ll want to start on the left and move to the right, so you minimize smudging, or put a piece of paper towel under where your hand rests.
- Start with the cupcake paper. Mix up your chosen color. Add more water to one half of the color puddle to make a paler shade. I used Buff Titanium and a little Burnt Umber for the paper on the chocolate cupcake, and P. Rose and a little U. Blue for the vanilla one.
- Using a small round brush, dip into the darker part of the color puddle and paint down the cupcake fold line. While this is still wet, quickly clean your brush, dab it on a towel and then brush along the line to feather the color out to the edges of the fold, so that the edge is lighter than the fold line. Download the kit for a visual example.
- Use the paler parts of the color to fill in the rest of the areas, leaving a very light edge along the outer part of the fold to create the illusion of depth.
- Use the darker shade of your paper color to fill in the inside curves of the paper, leaving the edge closest to the frosting untouched. This is where the “cake” part of the cupcake shows.
- To paint a vanilla cupcake, mix a little yellow and the buff color, and add water to get a medium shade. For a chocolate cupcake, use the burnt umber with just a little water to make it fluid. Use the reference picture to help guide you.
- For the frosting, create your frosting color, and using the same steps above (steps 6-8), paint the frosting using the darker shade for the frosting “folds”, and the paler color for the main frosting areas. I mixed Burnt umber and a little P. Rose for my chocolate frosting.
- Use the reference images at the end of this document as a guide for painting the fruit and other details, paying attention to where the color is darker and lighter.
- For instance, on the blueberry, start with a watered-down shade of ultramarine blue. Paint the whole berry, then let the area dry. Add another layer of color along the edges where the color is darker. Quickly clean your brush, dab it on a towel and pull or feather the color out with a clean brush.
- Follow this same method to paint the other details. For the strawberry, I mixed the P. Rose color and a little yellow. For the cherry, I used P. Rose. For the candle, I used yellow and green, and a red-blue mixture for the straws, but choose the colors you like. On the bow of the chocolate cake, I use the same color I used for the strawberry.
- Once you are done with the cupcakes, choose one of the colors in the cupcake for the lettering. I used a light and a dark brown watercolor pencil to complement the chocolate cupcake. I first did the letters in the lighter brown, then “edged” them with the darker color to create a neat two-toned look. I did the same with a pink pencil for the vanilla cupcake lettering to pick up the cupcake paper color, and purple/blue color to edge them to pick up the color in the blueberry.
- Allow the diy birthday card to dry completely, then use the kneaded eraser to remove any pencil marks you want to remove.
- Do not try to erase on a wet card, it will tear the paper.
- If the marks have been painted over, you may not be able to remove them.
- Remove the tape around the card. Voilà, you have a finished diy birthday card, ready to send!
PS: Another idea: Trace only the letters onto the card. Paint the cupcake on another piece of watercolor paper. Once it is dry, cut it out and use sticky dots to adhere it to the lettered card for a three dimensional diy birthday card effect.
Resources
- Tracing using graphite paper: https://www.insidewatercolor.com/graphite-paper.html
- Using masking fluid: https://www.insidewatercolor.com/masking-fluid.html
- Choosing colors: https://www.insidewatercolor.com/mixing-colors.html
- Strathmore cards on Amazon: https://amzn.to/2YBSS2U
- Sakura Micron markers on Amazon: https://amzn.to/2W7Heem
- Kneaded erasers on Amazon: https://amzn.to/2A5OTBz
